Blog
Custom Tile Shower Installation: Durock, Waterproofing, and the Right Sequence
Published
Category
Construction Guides
Walk through the complete custom tile shower installation process — from Durock cement board to waterproofing membrane, tile layout, and grouting — the way it's done on SEGC custom homes.
Your Master Shower Is Only as Good as What's Behind the Tile
The master shower is one of the most used spaces in any custom home. It handles gallons of water every single day, in a compact space surrounded by framing, drywall, and finished surfaces that absolutely cannot get wet. If the waterproofing fails — even in one small area — you're looking at mold, rot, structural damage, and a tearout that can cost $15,000-$25,000 to repair.
That's why the substrate and waterproofing behind the tile matter more than the tile itself. At South Eastern General Contractors, we've built hundreds of custom tile showers in homes across Fayetteville, Fort Bragg, and the surrounding communities. Every one follows a specific sequence — because in shower construction, order of operations is everything.
Step 1: Framing and Blocking
Before any cement board goes up, the shower framing needs to be right. This means:
Studs at 16" on center — standard spacing for cement board substrate. Some tile contractors prefer 12" OC for large-format tiles (12x24 or larger) to reduce flex.
Solid blocking at all fixture locations — shower valve, shower head, body sprays, grab bars, niches, and any wall-mounted accessories need solid 2x blocking between studs. This blocking needs to be installed during rough framing, not after the cement board is up.
Proper niche framing — Recessed shower niches need headers, sills, and side framing that are plumb, level, and sized for the niche dimensions plus the cement board and tile thickness on all surfaces.
Curb framing — The shower curb is typically framed from three stacked 2x4s or a single 2x6 on flat, secured to the subfloor with construction adhesive and screws. The curb height needs to account for the cement board, waterproofing membrane, mortar bed, and tile on all surfaces.
Step 2: Pre-Slope (Mud Bed) for the Shower Floor
Before cement board goes on the walls, the shower floor gets its pre-slope. This is a mortar bed (a mixture of Portland cement and sand) that creates the slope directing water to the drain. The standard slope is 1/4" per foot from the walls to the center of the drain.
The pre-slope sits on top of the subfloor and beneath the waterproofing membrane. A two-piece (clamping) drain is used — the lower portion is set into the pre-slope, the waterproofing membrane laps over the drain flange, and the upper clamping ring sandwiches the membrane to create a watertight seal.
This is one of the most critical steps in the entire shower build. If the pre-slope doesn't have consistent fall to the drain, water will pool in low spots beneath the waterproofing membrane and eventually find a way out — usually into the floor framing below.
Step 3: Durock Cement Board Installation
With the pre-slope cured (minimum 24 hours), Durock cement board goes on the walls. Durock is a rigid panel made from Portland cement and aggregates, reinforced with a polymer-coated glass mesh on both sides. It provides a flat, rigid, moisture-resistant substrate for tile.
Key installation details:
1/2" thick for walls, 5/8" for ceilings — ceiling applications need the extra rigidity to prevent flex and tile popping
Fastened with 1-1/4" cement board screws — every 8" on edges and 12" in the field, driven flush (not countersunk, which weakens the panel)
1/8" gap at all joints — to allow for expansion. Joints are taped with alkali-resistant mesh tape and thin-set mortar, not drywall tape and joint compound
Bottom edge raised 1/4" off the shower floor — the cement board should NOT sit in standing water. The waterproofing membrane bridges this gap
Extends past the shower opening — cement board should continue at least 6" beyond the shower enclosure on the adjacent drywall face. Many builders stop the Durock right at the shower edge — this leaves a vulnerable transition point
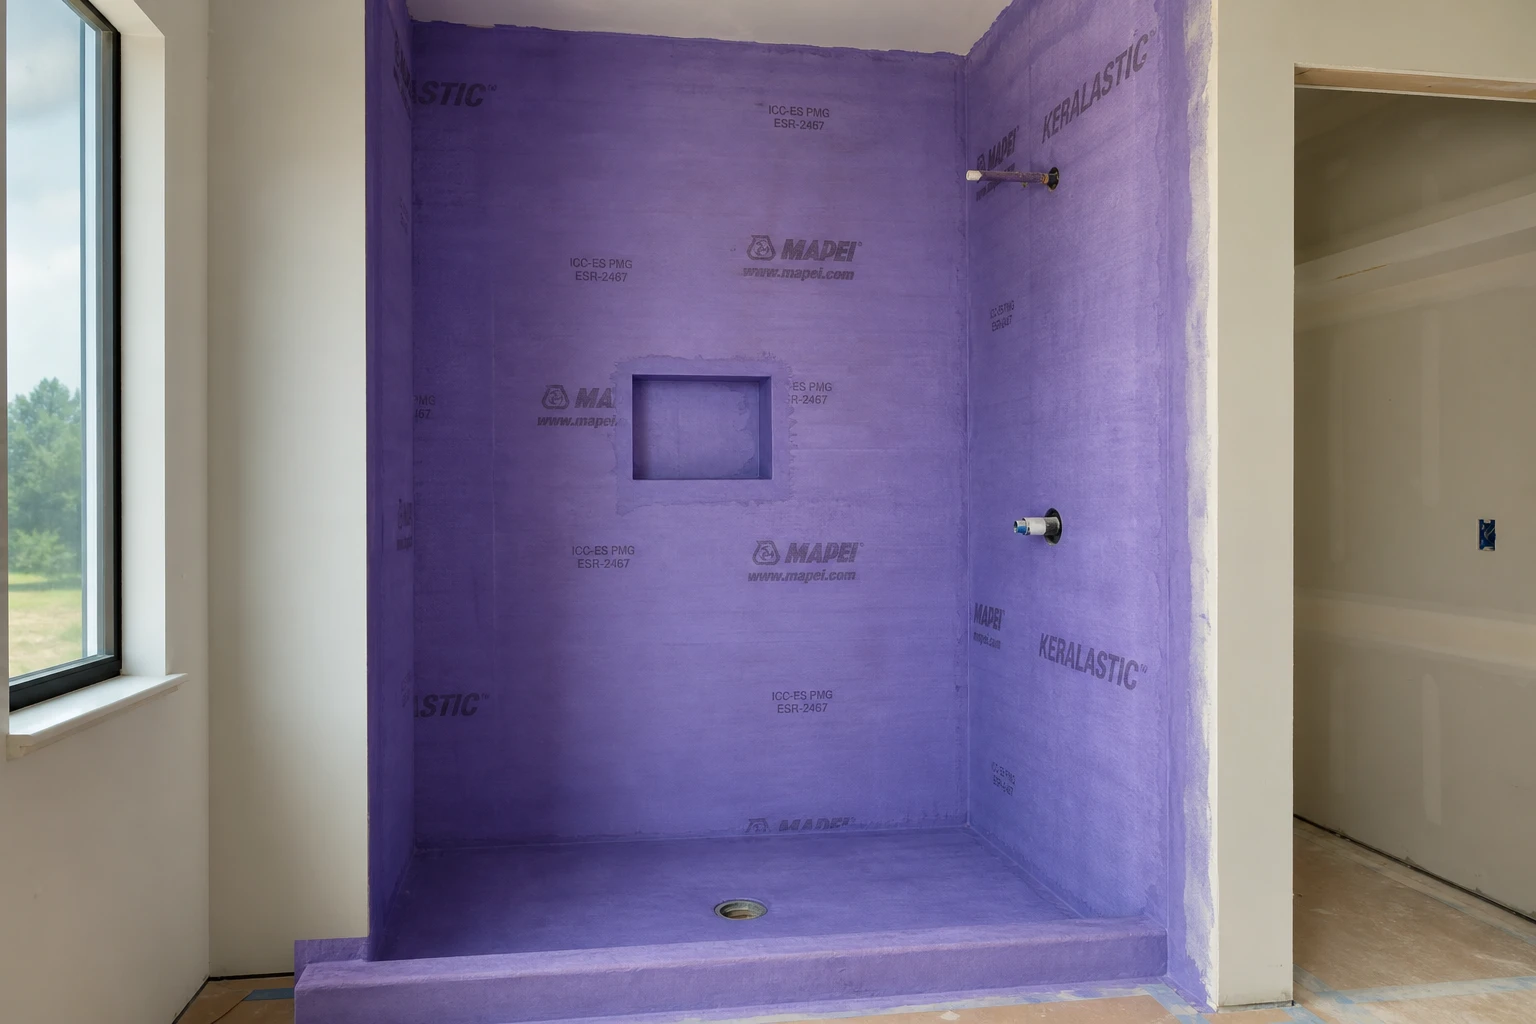
Step 4: Waterproofing — The Most Critical Layer
This is where the real protection happens. The cement board itself is moisture-resistant, not waterproof. Water will eventually migrate through it. The waterproofing membrane is the actual barrier that keeps water out of the wall cavity.
There are several waterproofing systems, but the two most common in residential construction are:
Sheet Membrane (Schluter Kerdi or similar)
A polyethylene sheet membrane bonded directly to the cement board with unmodified thin-set mortar. Seams are overlapped 2" and bonded with Kerdi-Band. Inside and outside corners get pre-formed corner pieces. This system is fast, consistent, and eliminates the guesswork of liquid-applied systems. Schluter Kerdi is our primary waterproofing system at SEGC.
Liquid-Applied Membrane (RedGard, Hydroban, or similar)
A paint-on waterproofing coating applied in two coats (minimum 60 mils dry thickness) over the cement board. Each coat needs to cure before the next is applied (typically 2-4 hours depending on temperature and humidity). Corners and seams get mesh reinforcement. This system is more labor-intensive and introduces more variables (coverage rate, cure time, thickness consistency), but it's effective when applied correctly.
Regardless of which system you use, the waterproofing must be continuous — floor to walls, around all penetrations (valve, shower head, niche edges), across the curb, and lapping onto the cement board beyond the shower opening. Any gap or pinhole in the membrane is a potential failure point.
Step 5: Tile Layout and Setting
With the waterproofing membrane fully cured and inspected, tile installation begins. The layout phase is where the shower goes from a waterproof box to a finished space, and the details matter enormously.
Layout Principles
Centered on the back wall — the first tile row is centered on the back wall, not started from a corner. This ensures symmetrical cuts on both sides.
Full tiles at eye level — cut tiles go at the bottom (hidden by the curb or floor) and at the top (less visible), with full tiles at standing eye level
Niche tile alignment — niche shelf tiles should align with the field tile grout lines. This requires planning the niche height and location during framing.
Floor tile slope — floor tiles are set on a mortar bed that maintains the 1/4" per foot slope to the drain. Large-format floor tiles (anything over 6x6) need the slope built into the mortar bed precisely, because the tile will telegraph any inconsistency.
Setting Materials
Tile is set with modified thin-set mortar — a polymer-modified Portland cement mortar that provides superior bond strength and flexibility. For large-format tiles, medium-bed mortar with a 1/2" x 1/2" square-notch trowel ensures full coverage on the back of the tile and the substrate.
Back-buttering (applying a thin coat of thin-set to the back of each tile in addition to the combed thin-set on the wall) is mandatory for tiles larger than 8x8 and for all natural stone. Coverage should be 95% minimum — meaning when you pull a tile off the wall, 95% of the back should have thin-set contact. Less than that creates voids where water can accumulate and tiles can crack under impact.
Step 6: Grouting and Sealing
After the thin-set has cured (minimum 24 hours), grout is applied. For shower applications, we use either:
Epoxy grout — completely waterproof, stain-proof, and doesn't require sealing. More difficult to work with and more expensive, but it's the best long-term option for showers.
Sanded cementitious grout with sealer — the traditional option. Less expensive and easier to install, but requires periodic resealing (every 1-2 years in a shower that gets daily use).
All inside corners and changes of plane (wall-to-wall, wall-to-floor, wall-to-curb) get color-matched silicone caulk, not grout. These joints need to accommodate slight movement between surfaces — grout will crack at these transitions, but silicone will flex.
Common Mistakes That Lead to Shower Failures
Skipping the waterproofing membrane — some builders treat Durock as if it's waterproof. It is not.
Using drywall in the shower (even "moisture-resistant" drywall) — Green board and purple board are not shower substrates. Period.
Inadequate pre-slope — water pooling under the membrane leads to mold growth and eventual membrane failure
Running grout instead of caulk at inside corners — guaranteed cracking within the first year
Not testing the waterproofing — a flood test (filling the shower pan with 2" of water and leaving it for 24 hours) should be done before any tile goes on the floor. If the membrane leaks, you want to know before $5,000 of tile is installed on top of it.
What It Costs in 2026
Custom tile shower pricing in the Fayetteville, NC area varies widely based on tile selection, shower size, and complexity. As a rough guide:
Standard master shower (3x5 enclosure, porcelain tile): $6,000-$10,000 installed
Mid-range (larger enclosure, accent tile, niche, linear drain): $10,000-$18,000
Premium (natural stone, multiple niches, body sprays, frameless glass): $18,000-$35,000+
Build It Right from the Start
At South Eastern General Contractors, we've been building custom homes with expert tile and masonry work in Fayetteville and the surrounding North Carolina communities for over 21 years. Every custom shower we build follows the full sequence — proper framing, pre-slope, Durock, waterproofing, and professional tile installation. No shortcuts.
Planning a custom home with a master shower that will last? Contact SEGC at (910) 565-4719 or visit southeasterngc.com.

South Eastern General Contractors
South Eastern General Contractors is a Native American-owned, 8(a) and HUBZone certified construction firm with over 21 years of proven results across Fayetteville, Lumberton, and the surrounding North Carolina communities. We build legacies, not just structures.
Ready to Build With Clarity and Confidence?
Your project deserves more than a contractor who just shows up and starts building. We guide you through a professional design-build process built around clear plans, detailed selections, documented scopes, and construction checklists that help eliminate confusion, mistakes, and missed expectations.
Other Blogs


